To backup a large MySQL database on a regular basis, I am going to use a method of taking snapshots of the database files using LVM in linux. The volume I will be using to create the logical volume is a RAID 1 (mirrored) array, as I created in the mdadm creating a new array guide.
Creating the volume group with lvm
The array we are using as the basis of the volume group is /dev/md0. Firstly we need to initialise the RAID array (you can use raw block devices or other partitions) for use as a physical volume. This is simple:
$ pvcreate /dev/md0
  Physical volume "/dev/md0" successfully created
The volume can now be used to make a volume group (I am calling this volume group vgssd, to state that it’s the SSD group):
$ vgcreate vgssd /dev/md0
  Volume group "vgssd" successfully created
Show some information about the newly created volume group
$ vgdisplay vgssd
  --- Volume group ---
  VG Name               vgssd
  System ID
  Format                lvm2
  Metadata Areas        1
  Metadata Sequence No  1
  VG Access             read/write
  VG Status             resizable
  MAX LV                0
  Cur LV                0
  Open LV               0
  Max PV                0
  Cur PV                1
  Act PV                1
  VG Size               439.87 GiB
  PE Size               4.00 MiB
  Total PE              112607
  Alloc PE / Size       0 / 0
  Free  PE / Size       112607 / 439.87 GiB
  VG UUID               ae5CoA-J0v4-eo0j-GyJd-DGvl-t7bF-zQd1wV
This shows we’ve got around the 440GB free for creating logical volumes on this device. We won’t be using it all, as we need to allow room for snapshots.
Creating the logical volume with lvm
It’s up to you to decide how to create and use your partitions. Remember that using LVM allows you to resize (extend and shrink) your volumes, as well as add more physical hard drives to the system. We have created a block device that now is mirrored over 2 SSD harddrives. I will be setting up a 250GB partition for use with mysql data, and allowing loads of space for snapshots, and extending it going forward.
$ lvcreate -L250G -n mysql_data vgssd
  Logical volume "mysql_data" created
I am going to mount this at: /var/mysql_data, and format it to be an ext4 filesystem, and make sure that access times are not recorded on mounting in fstab (noatime)
$ mkdir /var/mysql_data
$ mkfs.ext4 /dev/vgssd/mysql_data
mke2fs 1.42.9 (4-Feb-2014)
Discarding device blocks: done
Filesystem label=
OS type: Linux
Block size=4096 (log=2)
Fragment size=4096 (log=2)
Stride=0 blocks, Stripe width=0 blocks
16384000 inodes, 65536000 blocks
3276800 blocks (5.00%) reserved for the super user
First data block=0
Maximum filesystem blocks=4294967296
2000 block groups
32768 blocks per group, 32768 fragments per group
8192 inodes per group
Superblock backups stored on blocks:
	32768, 98304, 163840, 229376, 294912, 819200, 884736, 1605632, 2654208,
	4096000, 7962624, 11239424, 20480000, 23887872

Allocating group tables: done
Writing inode tables: done
Creating journal (32768 blocks): done
Writing superblocks and filesystem accounting information: done
This is a short guide on using mdadm, and other command line tools to create a RAID 1 mirrored array from 2 harddrives in Linux (Ubuntu 14.04)
Guide
Firstly, lets get a list of the harddrives in the system:
$ lsblk
NAME                    MAJ:MIN RM   SIZE RO TYPE MOUNTPOINT
sda                       8:0    0 447.1G  0 disk
sdb                       8:16   0 447.1G  0 disk
sdc                       8:32   0   1.8T  0 disk
├─sdc1                    8:33   0   512M  0 part /boot
└─sdc2                    8:34   0   1.8T  0 part
...
We’re going to use sda, and sdb to create the array of devices. I am going to be creating a partition that nearly fills the harddrives (440G), but not completely. This allows us to rebuild from other drives in the future that may not be exactly the same size.
Creating the partitions
Note: We are deleting and modifying partitions here, please make sure you have backed up data, and that you are using the correct drive numbers
$ fdisk /dev/sda
Command (m for help): n
Partition type:
   p   primary (0 primary, 0 extended, 4 free)
   e   extended
Select (default p): p
Partition number (1-4, default 1):
Using default value 1
First sector (2048-937703087, default 2048):
Using default value 2048
Last sector, +sectors or +size{K,M,G} (2048-937703087, default 937703087): +440G

Command (m for help): t
Hex code (type L to list codes): fd
Changed system type of partition 1 to fd (Linux raid autodetect)

Command (m for help): p
Disk /dev/sda: 480.1 GB, 480103981056 bytes
255 heads, 63 sectors/track, 58369 cylinders, total 937703088 sectors
Units = sectors of 1 * 512 = 512 bytes
Sector size (logical/physical): 512 bytes / 512 bytes
I/O size (minimum/optimal): 512 bytes / 512 bytes
Disk identifier: 0x000071b7

   Device Boot      Start         End      Blocks   Id  System
/dev/sda1            2048   922748927   461373440   fd  Linux raid autodetect
Command (m for help): w
The partition table has been altered!

Calling ioctl() to re-read partition table.
Syncing disks.
Do the same on /dev/sdb, and afterwards, check the partitions are OK:
$ lsblk
NAME                    MAJ:MIN RM   SIZE RO TYPE MOUNTPOINT
sda                       8:0    0 447.1G  0 disk
└─sda1                    8:1    0   440G  0 part
sdb                       8:16   0 447.1G  0 disk
└─sdb1                    8:17   0   440G  0 part
sdc                       8:32   0   1.8T  0 disk
OK we have the two partitions. Make sure there no superblocks set on these two drives (i.e. make sure they’re clean):
This shows that these were clean drives, but it’s worth doing. Next we’re going to create the array itself
$ mdadm --create /dev/md0 --level=1 --raid-devices=2 /dev/sda1 /dev/sdb1
mdadm: Note: this array has metadata at the start and
    may not be suitable as a boot device.  If you plan to
    store '/boot' on this device please ensure that
    your boot-loader understands md/v1.x metadata, or use
    --metadata=0.90
Continue creating array? y
mdadm: Defaulting to version 1.2 metadata
mdadm: array /dev/md0 started.
Add the information from the mdadm --detail --scan to the /etc/mdadm/mdadm.conf file, so quicker boots, etc and the device is found. Remove the name field from the output of the mdadm command.
Also you need to update the boot image with the following:
$ update-initramfs -u
And that’s it for creating a mirrored RAID 1 array. We’re not building file systems on this device, as I will be using it as the basis of a LVM with snapshots. In a follow up guide here, I’ll be creating a logical volume on top of this raid array.
This is a simple guide on how to create an empty git repository for development purposes, as well as creating a remote repository to push/pull to and from.
I am assuming you have a remote server, with SSH usersname and keys created for this guide. I find that using SVN is a good way to get going and hosting remote git repositories, and this is the way I previously used SVN for source code management.
Files already on local machine
If you have files already on a local machine the following code will turn this into a local repository:
$ git init
It’s as simple as that. Then use git add and git commit to commit the files to the master branch.
Creating the remote git repository
It’s all well and good to have a local git repository, but next we need to have somewhere central to manage this. I use SSH to talk to the remote git server. To create a remote SSH into that box, and by default I store my git repositories in /var/git/. So firstly create a new folder for the repository, and then initiate a ‘bare’ repository.
$ mkdir /var/git/repo_name/
$ cd /var/git/repo_name/
$ git init --bare
That will create an empty repository in that location. We can now add the remote repository to the local branch, and push the contents to it, and test a checkout/clone elsewhere. So on the local box in the repository folder, carry out the following commands to add a remote, and push the new branch to it:
That should give you a basic installation with defaults. The config file for mongod is located at /etc/mongod.conf
Checking mongo, and a few shell commands
Mongo by default has no security restrictions, we will go over these in another article at some point, so let’s make a small test database, with a new collection and insert some data to make sure that mongod is up and running
$ mongo

MongoDB shell version: 3.0.3

connecting to: test

> use funideas

switched to db funideas

> db.usefullinks.insert({'title': 'Install Mongo and PHP Driver', 'url': 'http://www.fun-ideas.co.uk/2015/06/01/installing-mon…and-php-driver/'})

WriteResult({ "nInserted" : 1 })

> show collections

system.indexes

usefullinks

> db.usefullinks.find().pretty()

{

	"_id" : ObjectId("556c49a2088aa312641e7ac6"),

	"title" : "Install Mongo and PHP Driver",

	"url" : "http://www.fun-ideas.co.uk/2015/06/01/installing-mon…and-php-driver/"

}

> exit
Note the “_id” will be unique yo your system, so may vary from what we’ve inserted there.
We will keep this database and collection there (think of a collection as a table in MySQL/other relational database).
Installing PHP Driver
Using the guide from the Installing PHP MongoDB Driver page, we do the following: $ sudo pecl install mongo
I choice no the sasl support, as this is not needed. You will need to add extension=mongo.so to any php configurations that require it, I want it to be available for all modules (apache2, fpm, and cli), so I create the a file at /etc/php5/mods-available/mongo.ini
$ echo extension=mongo.so > sudo tee /etc/php5/mods-available/mongo.ini

extension=mongo.so

$ sudo php5enmod mongo

$ sudo service apache2 restart

$ sudo service php5-fpm restart
And that should have enabled the latest mongo driver for PHP. To check using the command line interpreter use the following: $ php -r "phpinfo();" | grep mongo
/etc/php5/cli/conf.d/20-mongo.ini,
mongo
mongo.allow_empty_keys => 0 => 0
mongo.chunk_size => 261120 => 261120
mongo.cmd => $ => $
mongo.default_host => localhost => localhost
mongo.default_port => 27017 => 27017
mongo.is_master_interval => 15 => 15
mongo.long_as_object => 0 => 0
mongo.native_long => 1 => 1
mongo.ping_interval => 5 => 5
Simple PHP script to test the mongo database
I create the following PHP script called test_mongo.php to check that the driver worked, and used the data we created earlier: <?php
# Create connection to localhost, on port 27017
$objMongo = new MongoClient('localhost:27017'); // The 'localhost:27017' can be omitted as these are defaults
# Get a link to the funideas database
$objDB = $objMongo->funideas;
# Select a collection
$objCollection = $objDB->usefullinks;
# Search the usefullinks collection
$objCursor = $objCollection->find();
# Loop through the collection and output each item found
foreach($objCursor AS $objDoc) {
print_r($objDoc);
}
Executed the file, and checked the output: $ php test_mongo.php
Array
(
[_id] => MongoId Object
(
[$id] => 556c4b6950683786bfcd8b6d
)
This is the first post in a number of posts designed to look at using distributed file systems for use from PHP. MogileFS (https://code.google.com/p/mogilefs/) is the first one I will look at. From initial research the pros of MogileFS are as follows:
Easily distributed
Simple to setup/administer
Different classes of files
No single point of failure (although the MySQL database needs to be mirrored)
Well tested in production
The cons:
Files aren’t really file system accessible (uses HTTP)
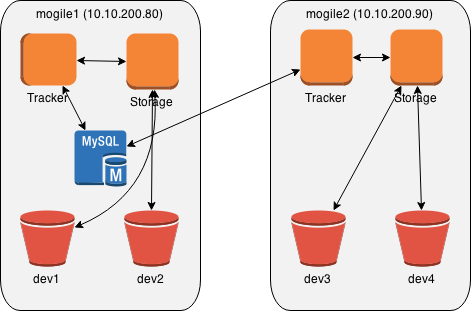
Terminology/Components
It took me a little while to grasp the concepts of the mogileFS components, and therefore I thought I would write my own understanding on them here.
Database – Usually MySQL, all trackers point to it
Tracker – Interface for interacting with mogile
Storage Node – Where the files are stored
Domains – A ‘namespace’ of where files are kept, think buckets, or ‘root’ folder
Keys – A ‘filename’ can be anything, but gives files their names
Classes – Class for files, mainly gives retention policy (number of devices or hosts to backup onto)
MySQL Database
You will have one MySQL database and it’s up to you backup/distribute make this high availability. All trackers need to point to this ONE MySQL database.
Tracker (mogilefsd)
You want to have at least 2 trackers, and these point to the MySQL database above. The app ‘talks’ and makes requests to the trackers and they carry out tasks, such as distributing the load, doing the file system checks, and making sure the hosts and devices are online.
Storage Node (mogstored)
The storage node can be separate computers, and are made up of hosts (the program that takes commands, etc), and the ‘devices’ that are stored. You can (and probably should) have multiple devices on each storage node, these can be separate disks, folders, partitions, etc. You do NOT need RAID, and can use any file system you wish for the underlying storage (will use ext4 in these examples). You add hosts, and then devices to these hosts as you go.
The test setup
I am going to create a test system on 2 virtual hosts as follows:
Test layout of the two mogile servers
I will install mogile1 first, add some files, and then bring up mogile2, and hopefully the files should sync between the two systems.
The hosts file on both of the systems are as follows:
Once installed, I then, modified the /etc/mysql/my.cnf and changed the bind-address to 0.0.0.0, so that mogile2 can access later, and then restart mysql:
$ sudo service mysql restart
Next is to create the database we’ll use with the user to access it.
mysql> GRANT SELECT,INSERT,UPDATE,DELETE,CREATE,ALTER ON mogilefs.* TO mogileuser@localhost IDENTIFIED BY 'secret';
Query OK, 0 rows affected (0.00 sec)
mysql> GRANT SELECT,INSERT,UPDATE,DELETE,CREATE,ALTER ON mogilefs.* TO mogileuser@'10.10.200.%' IDENTIFIED BY 'secret';
Query OK, 0 rows affected (0.00 sec)
And that’s the end of setting up the database from the mysql point of view.
Installing the tracker, and storage nodes
Instead of a large install process, there are PPA’s out there including what you need for debian/ubuntu. The following steps will install the tracker, storage and utility parts of the system:
This will install a load of items, but fail during install on mogilefs-util, this can be rectified by:
$ sudo apt-get install -f

$ sudo apt-get upgrade
There is an issue with the version of Syscall.pm (Syscall perl module), that comes with Ubuntu 14.04, the version 0.25 needs to be patched with the file here: Syscallpatch.txt:
I used the defaults for these. It sets up the files in /etc/mogilefs/. Update the /etc/mogilefs/mogilefsd.conf file, and update the db_dsn, db_user, db_password, and listen host/port (so that it’s 0.0.0.0 so that other programs can connect).
Next step is to setup the database tables, using the mysql authentication details from above, we are using one of the utlities to create the database called mogdbsetup.
The database is then created. Start the deamon, and check it’s working:
$ sudo service mogilefsd restart

Restarting mogilefsd: mogilefsd.

$ mogadm check

Checking trackers...

  127.0.0.1:7001 ... OK
Checking hosts...
No devices found on tracker(s).
Hopefully you see the same as the above.
Configuring and adding the storage node
Lets create two ‘devices’ to use for storing the files. Normally these would be different partitions/drives, but in this instance for test purposes we’ll just create two folders in /var/mogdata/:
And then add the two devices we’ve made to the trackers $ mogadm --trackers=mogile1:7001 device add mogile1 1
$ mogadm --trackers=mogile1:7001 device add mogile1 2
$ mogadm check
Checking trackers...
127.0.0.1:7001 ... OK
Modified the /etc/mogilefs/mogilefsd.conf file, and update the db_dsn, db_user, db_password, and listen host/port (so that it’s 0.0.0.0 so that other programs can connect).
The database is then created. Start the deamon, and check it’s working:
$ sudo service mogilefsd restart

Restarting mogilefsd: mogilefsd.
Create dev3, and dev4 files in /var/mogdata and change the ownership mogstored. And add the host and devices to the trackers:
And then add the two devices we've made to the trackers $ mogadm --trackers=mogile1:7001,mogile2:7001 device add mogile2 3
$ mogadm --trackers=mogile1:7001,mogile2:7001 device add mogile2 4
$ mogadm check
Checking trackers...
127.0.0.1:7001 ... OK
Checking hosts...
[ 1] mogile1 ... OK
[ 2] mogile2 ... OK
Check that files are being added to the dev folders, and being synced between the devices.
Extra config
Instead of having to write --trackers=mogile1:7001,mogile2:7001 on all the commands, you can create a file in /etc/mogilefs/mogilefs.conf (or ~/.mogilefs.conf) containing the following line:
trackers=mogile1:7001,mogile2:7001
You can also add a domain=testing or whatever for the default domain.
Final words
This is an initial setup. Please note that all the mogilefs deamons are not security protected in anyway, and therefore should be firewalled properly from the hosts that shouldn't be able to access the files. Also the MySQL database should be replicated and backed up properly (possibly even using some of the domains).
This was a detailed installation guide, and should get you up and running. I will be creating a few more guides once I have had a play with PHP accessing the files.
When creating a virtual machine with an LVM partition, it will create partitions within that LVM partition. Mounting those ‘sub’ partitions requires an extra step to access them. I used this when I was cloning virtual machines so that I could change the hostname of the copied host before booting it up.
A tool called kpartx is your friend here. It allows the system to see partitions within a LVM partition, so they can be mounted. In this guide we will be accessing partitions created as part of my mogilefs playground virtual machines. Below are the partitions that we are trying to access:
$ sudo fdisk -l /dev/vhosts/mogile2
Disk /dev/vhosts/mogile2: 5368 MB, 5368709120 bytes
255 heads, 63 sectors/track, 652 cylinders, total 10485760 sectors
Units = sectors of 1 * 512 = 512 bytes
Sector size (logical/physical): 512 bytes / 512 bytes
I/O size (minimum/optimal): 512 bytes / 512 bytes
Disk identifier: 0x000b30be
Device Boot Start End Blocks Id System
/dev/vhosts/mogile2p1 * 2048 9437183 4717568 83 Linux
/dev/vhosts/mogile2p2 9439230 10483711 522241 5 Extended
/dev/vhosts/mogile2p5 9439232 10483711 522240 82 Linux swap / Solaris
NOTE: Make sure that the virtual machine is NOT running before mounting these partitions
So let’s try and mount one of these partitions (/dev/vhosts/mogile2p1):
$ sudo mount /dev/vhosts/mogile2p1 /mnt/temp

mount: special device /dev/vhosts/mogile2p1 does not exist
So the following will help map these partitions to the host OS so they can be mounted. If you haven’t got kpartx installed, then on debian/ubuntu systems install with sudo apt-get install kpartx
kpartx guide
To allow the host system to see the partitions for mounting, we run the following:
$ sudo kpartx -a /dev/vhosts/mogile2
We can then mount with
$ sudo mount /dev/mapper/vhosts-mogile2p1 /mnt/temp
And then use it as we normally would. In this case, I used it to edit the /mnt/temp/etc/hostname and /mnt/temp/etc/hosts file
Finally un mount it: $ sudo umount /mnt/temp
And if you are done with it, and cleaned up, then remove it from the partition tables:
This is a guide on copying the base 14.04 Ubuntu image to another machine to use. Hope fully all that is needed it to create the new file system, and change the hostname.
Creating the file system
Firstly, I create the file system the machine would use, on the existing LVM partitions, make this the same size as the base 1404 (can resize it later if needs be):
Make sure that the base 1404 server isn’t running (not listed in virsh list), and then copy the drive over. (Block size of 64k, seems a good bet for copying) $ sudo dd bs=64k if=/dev/vhosts/base-1404 of=/dev/vhosts/mogile1
Creating the virtual host
Next to make the copy. I copied the /etc/libvirt/qemu/base-1404.xml to /tmp/mogile1.xml and changed the following lines:
Make sure that the uuid is only HEX digits and letters (0-9 a-f).You can change the ram or CPUs, etc as needed. (uuidgen is a good command for making a new UUID)
Once you have created the xml you can use the following commands to create, and then start the domain:
$ virsh define mogile1.xml

Domain mogile1 defined from mogile1.xml

$ virsh dumpxml mogile1
You can then start it up with: $ virsh start mogile1
Remember to change the hostname in /etc/hostname and /etc/hosts after reboot, and all will be good. Although you could do this on the copy of the hard drive before you boot it up. See the how to mount partitions guide for information on this
I wanted to create a base install of Ubuntu so that I could keep all the security patches up to date, and then create copies of the base image for other tests, and playing around.
The guide was made when installing a basic Ubuntu 14.04 server image on a KVM hypervisor. All the commands were run as root (or via sudo).
Creating the file system
Firstly, I create the file system the machine would use, on the existing LVM partitions:
Starting install…
Creating domain… | 0 B 00:04
Domain installation still in progress. You can reconnect to the console to complete the installation process.
The options give 512MB ram, the location to the hard drive to use, a location to a cdrom drive to use (or image) for install. Type of OS, and the variant. Whether to use acceleration, what network to use, and to start with a vnc console, to install it with.
Note: To get a list of os variants available, use:
$ sudo virt-install --os-variant list
Connection to the vhost over VNC
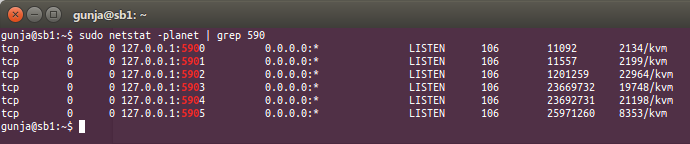
To connect the VNC console to actually carry out the installation, have a look at what is being listened to on the network:
Listing all VNC terminals for the KVM virtual hosts
The last one should be the one to connect to, so lets tunnel from desktop machine to there, and try and connect:
$ ssh sb1 -L5905:localhost:5905
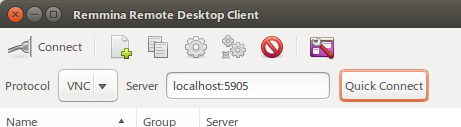
And then connect using your VNC software:
Conecting to the new virtual machine using remmina and VNC
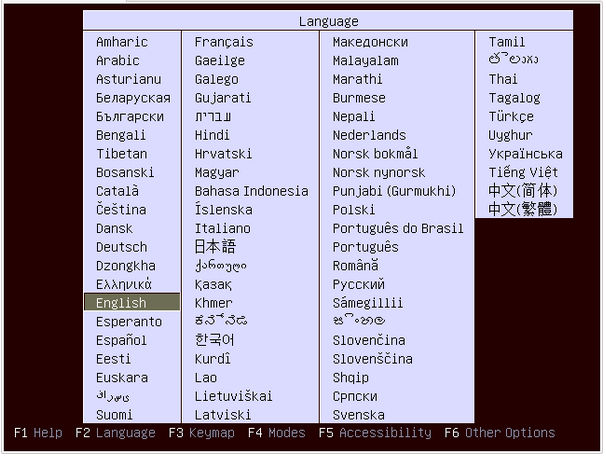
And away you go:
Ubuntu install page over KVM
If you need the network address, look in the folder: /etc/libvirt/qemu for the xml configuration file (in this case base-1404.xml), and look for the tag. Or xmldump from the virsh.
Welcome to my new blog. Over the next few weeks and months, I will be adding content with regards to distributed file systems for PHP projects, starting with experiments with MogileFS, and GlusterFS.
Also will probably start with KVM virtual machine guides.